Obedience Training :: Sit
In the second lesson at Aylwards Dog School, Mike and his team show you how to train your dog to sit on command.
During the lesson, you would have had your dog sitting under the guidance of the trainers on the field. In the coming week you will need to practice walking to heel, sit and “waiting” with your dog.
During the second week of training you should be practicing the following with your dog to reinforce the lessons taught in class:
- Walking to heel – left turn, right turn & about turn. (Refer to the Walking to Heel training notes)
- Sit on command when stopping or turning.
- Turns at the halt. About turn & sit. Right turn & sit. Left turn & sit.
- Waiting & Leave – make your dog sit beside you for two minutes regardless of distractions.
- Finish.
Please NOTE: These training notes are only intended for Aylwards Obedience Course participants who attend classes at the Dog School under the guidance of qualified dog trainers. They are not full instructions on how to train your dog to walk to heel & sit. If you would like to train your dog to walk to heel, sit, down, stay and come, please enrol in our next Dog Obedience Course.
The Correct Sit Position
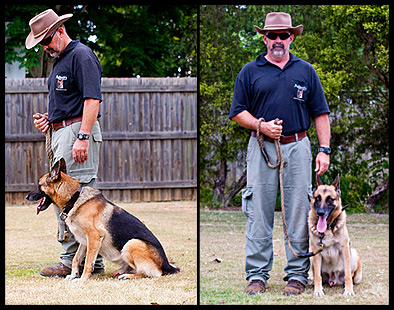
When your dog is in the correct sit position, their front legs should be in line with your legs. They should also be sitting ‘square’ with their hind legs directly behind their front legs.
Suggested Training Session
Now that your dog has been taught to sit during the class. You should start your training session with your dog sitting by your side.
1. Warm Up: Warm your dog up for training with practicing your walking to heel training for a for a few minutes. Remember to vary your pace from slow to fast walking, focusing on encouraging your dog to stay close to your side with verbal & physical cues. Only check / correct your dog when required and remember to work on a loose lead at all times.
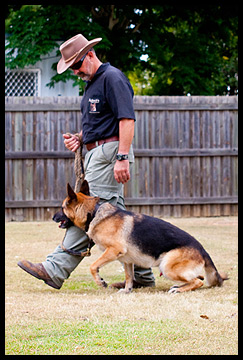
2. Turns to the Halt: When your dog is walking to heel well, practice sit with left, right and about turns at the halt. e.g. About turn, sit. Right turn, sit and Left turn, sit. When practicing at the halt, you do not step off and you should be working in a small space. Remember to keep consistent with your steps so that your dog learns to follow the movement of your legs.
3. Walk to heel & Sit: Advance to walking to heel and then sit. e.g. For example practice the following combinations:
- Walk in a straight line for a few paces and sit.
- Walk in a straight line, about turn and sit.
- Walk in a straight line, right turn and sit.
- Walk in a straight line, left turn and sit.
Your working space will now be larger as you walk then command your dog to sit when you stop or turn and stop.
Timing & Pre-commands: For the sit when stopping and turning to the heel, timing is important with your pre-commands. Say sit, and make one step so that you give your dog time to sit in the right position beside you. When stepping off to walk to heel, always step off with your left leg first to follow your physical cues. Encourage quick responses for heel from your dog with pre-commands before turning and patting your left leg with your left hand that is always free of the lead.
4. Waiting. Make your dog sit for up to two minutes by your side. If he/she is distracted by anything, practice the command “Leave, Sit!”. Waiting is a pre-cursor lesson for the Stay lesson in coming weeks. If you have your dog successfully waiting, the stay lesson will be easier for you!
5. Finishing the lesson: To finish the lesson, make a right turn and sit. When the dog is sitting correctly, say “Finish” and over praise with happy high voice and lots of pats! Your dog is now free to walk on a long slack lead in front of you.
NOTE: Dogs learn routines very quickly. This is only a suggested training lesson plan to get you started practicing at home. As your dog gets better with practice, make sure you modify the training session above with different paces for walking to heel (slow & fast), figures of eight walking to heel, then stopping with sit and small fast sessions of turns to the halt.
Reinforcing Sit During your Practice.
After the first lesson, your dog should be sitting with a verbal pre-command of ‘sit’ followed by your physical cue taking one step, then stopping. Timing is important with your pre-commands for sit and will take some practice for you. If your dog is not sitting correctly or not listening to your verbal command and physical cue, you will need to correct the dog. If you need to correct your dog with sit, NEVER use your lead to correct them into the correct sit position.
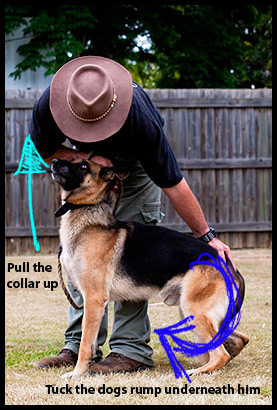
To correct a dog into the position for sit:
- Put your right hand in the collar, with the knuckles of your right hand facing forward as shown class. Place your left hand, palm down on the dogs back between his / her hip bones.
- Pull up with your right hand while simultaneously tucking your dogs bum underneath him with your left hand. NOTE: NEVER grab the dogs skin with your left hand to force their rump down on the ground. Dogs will react if their skin is pinched. NEVER attempt to push the dogs rump straight down to the ground. This can cause spinal damage to your dog.
Turn Left & Sit
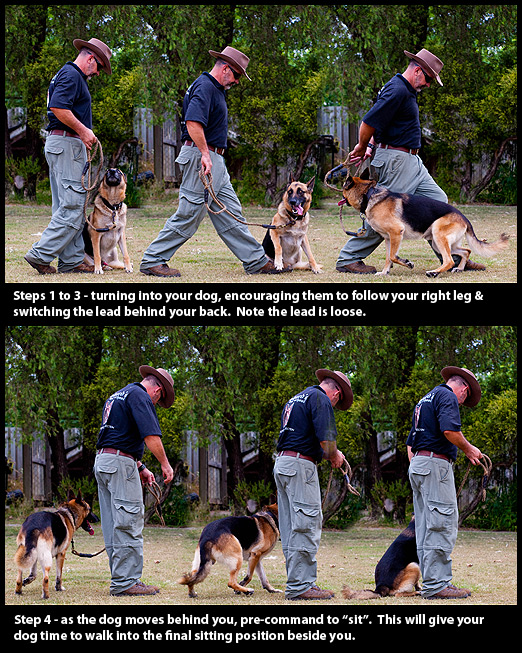
The left turn and sit is one of the most difficult turns to master correctly with your timing commands and foot work so that your dog learns your verbal and physical cues. Mike broke down the steps tor a left turn during the class and here are some pointers to help you practice this turn at home with your dog.
- Step 1: With your dog in the sit position, turn ‘into the dog’ so that your knees are facing the dog’s right shoulder.
- Step 2: Step back with your right foot, patting your leg with your right hand, using the command “heel”.
- Step 3: As your dog moves towards your right foot, switch the lead around behind your back. The lead should always be loose, never pull your dog around you with the lead.
- Step 4: As your dog moves behind you and BEFORE he / she reaches your left leg, say “sit” and step forward on your right leg. Giving the command “sit” when your dog is coming around behind you allows the dog time to sit in the correct position beside you.
Tips for Homework Practice Sessions
- Spend at least 10 minutes each day practicing the lessons taught during class at Aylwards
- Aim to work fast with your turns and sit activities. A dogs natural pace is a trot rather than a slow amble, so working briskly will keep him / her focused.
- Encourage with your voice and gestures. i.e. step off with your left leg from a stationary position & pat your left leg with your left hand to encourage the dog into you. Using a high voice with encouragement “Good boy / Good Girl” also helps with encouraging your dog close to you when walking to heel.
- Loose lead at all times. Only your right hand should be holding the lead. The left hand is only on the lead to check the dog correctly.
- Use different locations to train your dog to allow them to become accustomed to listening to you regardless of what is going on around them.
- Your dog will become more responsive to you with each practice session. The more you practice, the better you and your dog become with the lesson. However, aim to keep your lessons short with a maximum of 30mins.
- Remember to rest your dog and look for signs of heat stress if you are practicing on a hot day.
Questions
If you have any questions about training for walk to heel and sit, please add them in the comments section below. 🙂
Category: Training Notes

